OpenBSC GPRS » History » Revision 23
« Previous |
Revision 23/37
(diff)
| Next »
wirelesss, 12/21/2016 02:21 PM
- Table of contents
- OpenBSC GPRS/EDGE Setup page
OpenBSC GPRS/EDGE Setup page
Pre-requisites
- BTS hardware: sysmoBTS, USRP, UmTRX, nanoBTS with GPRS or EDGE support. BS11 are not supported.
- A compiled GGSN from OpenGGSN
- A working and up-to-date OpenBSC (see Building_OpenBSC)
- You will need to (re-)build it after having installed OpenGGSN so that the
libgtpis detected and the SGSN binaryosmo-sgsnbuilt.
- You will need to (re-)build it after having installed OpenGGSN so that the
- A custom SIM for your network
- Currently OsmoSGSN refuses all roaming, so you need a SIM that matches your custom MCC/MNC network
Setup
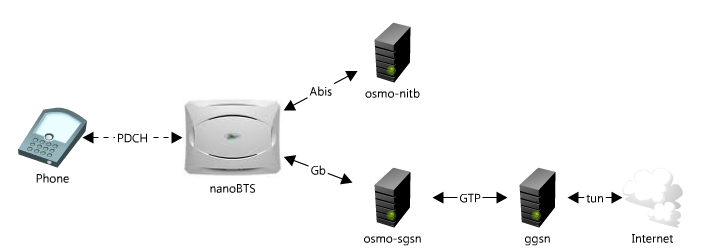
First a little picture to illustrate the different elements and their interactions :
Compiling OpenBSC with [E]GPRS
The guide below was tested on Ubuntu 15.10 but should work on Debian as well.
First you need to download all dependencies:
apt install libdbi0-dev libdbd-sqlite3 libtool autoconf git-core pkg-config make libortp-dev
Please follow instructions provided at Build from source in order to install these projects:
- openggsn
- libosmocore
- libosmo-abis
- libosmo-netif
- openbsc
- osmo-pcu
OpenBSC configuration
The first step is to configure OpenBSC for gprs support. Add this to the network/bts node in openbsc.cfg:
gprs mode gprs
gprs routing area 0
gprs cell bvci 2
gprs nsei 101
gprs nsvc 0 nsvci 101
gprs nsvc 0 local udp port 23000
gprs nsvc 0 remote udp port 23000
gprs nsvc 0 remote ip 192.168.0.128
The gprs nsvc 0 remote entries 192.168.0.128:23000 is the IP/port of the machine running the SGSN as seen from the BTS. It will be sent by OpenBSC to the BTS in the configuration phase and the BTS will connect back to the SGSN.
The second step is to allocate some timeslots to packet data. For this, just change the 1 or more network/bts/trx/timeslot nodes using :
phys_chan_config PDCH
OsmoSGSN configuration
Here's a sample SGSN configuration file osmo-sgsn.cfg with some explanations :
!
! Osmocom SGSN configuration
!
!
line vty
 no login
!
sgsn
 gtp local-ip 192.168.1.128
 ggsn 0 remote-ip 192.168.1.129
 ggsn 0 gtp-version 1
!
ns
 timer tns-block 3
 timer tns-block-retries 3
 timer tns-reset 3
 timer tns-reset-retries 3
 timer tns-test 30
 timer tns-alive 3
 timer tns-alive-retries 10
 encapsulation udp local-ip 192.168.0.128
 encapsulation udp local-port 23000
 encapsulation framerelay-gre enabled 0
!
bssgp
!
- The
gtp local-ipentry is the local IP the SGSN will bind to. - The
ggsn 0 remote-ipentry if the remote IP of the GGSN. The SGSN will connect to it. - Those two IPs must be different even if you're running both processes on the same machine. A solution for that is to put several IP aliases on the same network interface or use the loopback interface.
- The
encapsulationsettings must be the same IP/port than you've setup inopenbsc.cfg
OpenGGSN configuration
The ggsn.conf file is pretty well documented. What is mostly of interest here is :
- The configuration of the GTP link. (Must match the
ggsn 0 remote-ipentry inosmo-sgsn.cfg)
# TAG: listen
# Specifies the local IP address to listen to
listen 192.168.1.129
- The configuration given to phones, IP pool & DNS.
# TAG: dynip
# Dynamic IP address pool.
# Used for allocation of dynamic IP address when address is not given
# by HLR.
# If this option is not given then the net option is used as a substitute.
# dynip 192.168.254.0/24

# TAG: pcodns1/pcodns2
# Protocol configuration option domain name system server 1 & 2.
pcodns1 208.67.222.222
pcodns2 208.67.220.220
OsmoPCU configuration
pcu
 flow-control-interval 10
 cs 2
 alloc-algorithm dynamic
 alpha 0
 gamma 0
Network configuration
You will also need to configure some networking rules to allow connectivity from tun0. Look up linux networking/nat howtos on google.
Modern systems
Add following setting to /etc/systemd/network:
wired.network:
[Match]
Name=enp2s0

[Network]
DHCP=ipv4
IPMasquerade=yes
tun.network:
[Match]
Name=tun0

[Network]
Address=192.168.0.1
IPMasquerade=yes
The setup above assume that you're using interface enp2s0 to access the internet from the machine which runs openggsn. Notice the IPMasquerade option on both interfaces. This also assume the default 192.168.0.1/24 ip address range used by openggsn. If your situation differs - adjust accordingly using https://www.freedesktop.org/software/systemd/man/systemd.network.html as a reference.
Legacy systems
The basic setup for testing only in a safe environment would be :
sh# echo 1 > /proc/sys/net/ipv4/ip_forward
sh# iptables -A POSTROUTING -s 192.168.254.0/24 -t nat -o eth0 -j MASQUERADE
(replace eth0 by the interface providing your machine connectivity)
DNS issues
In some cases the DNS server might be hardcoded in the phones APN settings. To work around this problem one might choose to enforce the usage of a specific DNS server by redirecting all DNS traffic via iptables:
sh# iptables -t nat -I PREROUTING -i tun0 -p udp --dport 53 -j DNAT --to-dest 1.2.3.4
(replace 1.2.3.4 with the ip-address of your DNS-Server)
You can put this into .sh file and reference it from openggsn config using
ipup /full/path/to/your.sh
Running
Sample startup sequence (adjust logging and configuration files location as you see fit):
osmo-nitb -s -c ~/.config/osmocom/open-bsc.cfg -l ~/.config/osmocom/hlr.sqlite3 -P -m -C -T --debug=DSQL:DLSMS:DRLL:DCC:DMM:DRR:DMSC:DHO:DGPRS:DNS:DLLC:DCTRL 2>&1 | tee /tmp/openbsc.log
sudo ggsn -c ~/.config/osmocom/ggsn.conf -f -d
osmo-sgsn -c ~/.config/osmocom/osmo-sgsn.cfg -d DRLL:DCC:DMM:DRR:DNM:DMSC:DHO:DGPRS:DNS:DLLC:DCTRL

cd osmo-trx/Transceiver52M
sudo chrt 20 ./osmo-trx
cd osmo-bts/src/osmo-bts-trx
sudo chrt 15 ./osmobts-trx -c ~/.config/osmocom/osmo-bts.cfg -i 224.0.0.1 -d DRLL:DCC:DMM:DRR:DNM:DMSC:DHO:DGPRS:DNS:DLLC:DCTRL

osmo-pcu/src
sudo ./osmo-pcu -c ~/.config/osmocom/osmo-pcu.cfg
Note: OsmoTRX is only necessary with USRP/UmTRX transceivers (At the time of writing 201509-fairwaves-rebase branch of OsmoBTS is necessary as well for compatibility).
Once you're done with experimenting and ready for production setup it might be convenient to create systemd units so all the parts are started automatically.
Authorization Policy
Authorization determines whether particular subscriber can access your network or not.
The following four authorization policy options are available:
accept-all: When this option is selected then all IMSIs will be accepted. Using this pcan be dangerous one.
acl-only: In this case you will allow SGSN to accept only IMSI, which are explicitly white-listed by the Access Control List (ACL) and the rest will be rejected.
closed: This option allows you to accept only home network subscribers either the ones, which are in the ACL or MCC/MNC match. (i.e. MCC 901, MNC 700, IMSI 901700000003080).
remote: When this authorization option is selected then the GSUP protocol to remotely access a HLR will be used. Remote subscription data only will be used.
Example: How to assign or change current authorization policy follows below:
OsmoSGSN> enable
OsmoSGSN# configure terminal
OsmoSGSN(config)# sgsn
OsmoSGSN(config-sgsn)# auth-policy acl-only
OsmoSGSN(config-sgsn)# write
Configuration saved to sgsn.cfg
OsmoSGSN(config-sgsn)# exit
OsmoSGSN(config)# exit
OsmoSGSN# disable
OsmoSGSN>
In the example acl-olny is selected as authorization policy.
After this we are saving current changes to configuration file using command write to make this policy persistent.
Troubleshooting
- double-check that your phones have APN set to something. "Internet" will do for example. The value of APN is not checked but if it's unset the phones' baseband might not even try to initiate GPRS connection.
- OsmoNITB on port 4242 See osmo-nitb_VTY
- OsmoSGSN on port 4245. See osmo-sgsn_VTY
Updated by wirelesss over 7 years ago · 23 revisions

